Precautions for the use of calipers, practical!
2021.09.27
The caliper has many advantages such as multiple measurement modes, easy operation, durability, strong versatility, and low cost. It can be said that it is the most common measuring tool in the toolbox. However, there are still many precautions to use calipers correctly. Let's start with the error factors that affect the measurement results.
Error factor
When using calipers to measure, there are many factors that cause errors, such as parallax, errors caused by the structure not conforming to the Abbe principle, thermal expansion caused by the temperature difference between the caliper and the workpiece, and so on.
In addition, because the caliper has no constant pressure device, it is difficult to grasp a suitable and uniform measuring force when measuring, and it is also another factor that causes errors.
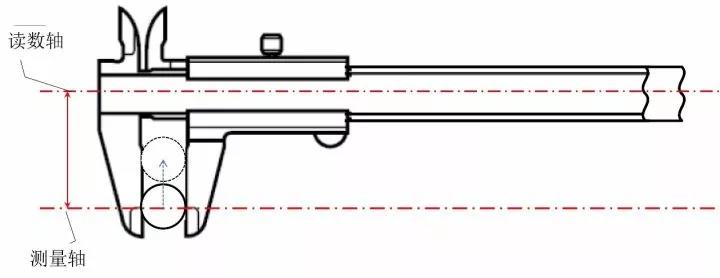
The structure of the caliper does not conform to Abbe's principle

The reading axis and the measuring axis of the caliper do not conform to the Abbe principle because of the different axes. Therefore, when using the caliper, measuring with the root or tip of the claw may increase the measurement error. When measuring, pay attention to the measured workpiece as close as possible to the ruler body part (reading axis).

Read the parallax of the scale
When checking whether the vernier tick mark is aligned with the main tick mark, look straight at the vernier tick mark.
There is a step height between the vernier ruler and the main ruler scale surface, which is easy to cause reading errors. As shown in the figure below, if you observe the vernier scale line from an oblique direction, the error shown by ΔX in the figure will occur. In order to avoid the influence of such factors, the JIS specification stipulates that the step height (H) should not be greater than 0.3mm.

The bending of the reference end face
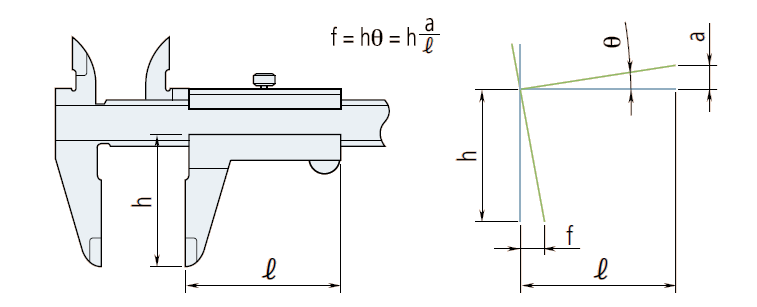
If the ruler surface that guides the sliding of the vernier is bent, it will cause the error shown in the figure below. This error can be expressed by the same calculation formula as the error that does not conform to the Abbe principle.

Example: Suppose the deformation caused by the curvature of the guide ruler surface is 0.01mm/50mm, and the outer diameter measuring claw tip is 40mm to calculate: f=40mm×0.01÷50=0.008mm
Relationship between measurement and temperature
The body of the caliper is generally made of stainless steel, which has the same coefficient of thermal expansion (10.2±1)×10-6/K as that of ferrous metals. The material of the measured object, the room temperature and the temperature of the workpiece must be considered when measuring.
Precautions in operation
The caliper claw is very sharp, so the instrument must be operated carefully to avoid personal injury.
Avoid damaging the scale of the digital caliper, do not engrave the identification number or use an electric pen to leave other information.
Avoid colliding with hard objects or falling on the stool or floor to damage the calipers.
Maintenance of sliding surface and measuring surface
Before using the caliper, wipe off the dust and dirt on the sliding surface and the measuring surface with a soft dry cloth.
Check and calibrate the origin before use
Clamp a piece of clean paper between the outer claws, and then slowly pull it out. Before using the caliper, close the measuring jaw and make sure that the vernier scale (or display) is reset to zero. When using a digital caliper, please reset (zero button) after replacing the battery.

Operation after use
After using the caliper, wipe off water and oil thoroughly. Then, lightly smear it with anti-rust oil and dry it before storing.
Waterproof calipers, in order to prevent rusting after use, also need to wipe off the moisture of the calipers.
Storage precautions
Avoid direct sunlight, high temperature, low temperature and storage in high humidity environment.
If the digital caliper is not used for more than three months, remove the battery before storing.
During storage, do not allow the outer measuring jaw of the caliper to be completely closed.
Previous:Structural elements and design methods of mechanical structural parts
Next:Machining price estimation method!
Related Information
- Industry news
- The tap or drill bit breaks in the hole, how to fix it?
- Why do airplanes use rivets instead of welding?
- Why are engineering drawings all blueprints?
- How is a ping pong ball made? It turns out that it is made of two pieces of plas
- What to do if quality is abnormal? Doing these 3 things well is the key!
- Weekly News 9.7-9.13
- Huawei's three-fold screen is approaching, and the domestic supply chain is wait
- Innovative application of digital twin technology in integrated die-casting prod
- 5 types of carbide cutting tools, what are the differences? Save this article an
- Global manufacturing PMI in June was 49.5% | Weekly News 7.6-7.12
- Raw material defects | Machining special operations and practical cases 109
- No wonder Toyota stamping is so good: a day in the life of a Toyota stamping sho
- Analysis on the development trend and demand of China's mold industry
- How many types of sealing rings are there in machinery? What are they used for?
- Hangfa, Hangfa, a scar on the hearts of machine processing workers
- How to mill a large arc surface with a small cutter?
- Dynamics of the processing center of the process! What is the fundamental reason
- 500 ° C ultra -strong aluminum alloy! This problem is overcome
- How much do you know about the hometown of machine tools and molds, how much do

 BACK
BACK MT HOME
 Navbar