Undercut dimensioning
2021.09.01
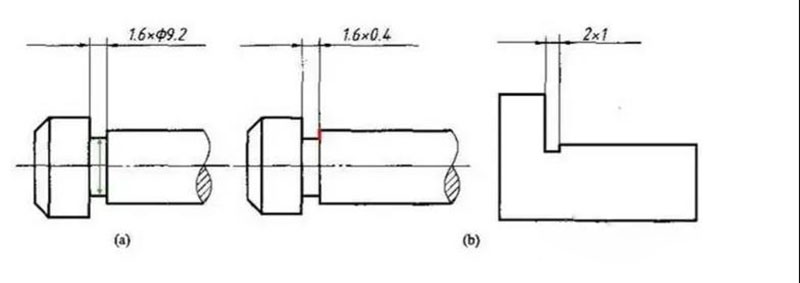
The undercut can be written in the form of "groove width×diameter" or "groove width×groove depth". Under what circumstances is "groove width×diameter" used? Under what circumstances use the "groove width × groove depth" standard?
The diameter 9.2 in the figure is the diameter of the part shown by the green line, and 0.4 is the height shown by the red line?

1. Under the premise that there is no requirement for "dimension accuracy", two types of labels (groove width×diameter or groove width×depth) can be used for the undercut, and the two can be converted. The accuracy of the “free tolerance” is no problem, so there is no need to consider the benchmark problem. ,
2. 1.6×0.4 undercut groove; 0.4 is the height shown by the red line, and the operator will not measure down based on the great circle. (The undercut is cut by a small round shaft)
3. The undercut has a standard in the "Machine Design Manual". According to the different structure of the part to be matched, it can be divided into A, B, C, D, E, F. Such marking is not a simple "groove width". ×diameter" or "groove width×groove depth"
for reference!

Use "groove width x diameter" when the diameter must be guaranteed.
Similarly, when the groove depth must be guaranteed, "groove width x groove depth" is used.
Although the same results may be obtained, the benchmarks and concepts are different.
When groove width×diameter: the base of groove depth is the center line.
When groove width×groove depth: the reference of groove depth is the contour line.
Prompt according to GB4458.4 (Mechanical Drawing Size Note Method):
In the figure, A and B belong to the general injection method of pin and shaft undercut, you can choose one of them.
In the figure, C belongs to the general notation of undercut for non-shaft.

Related Information
- Industry news
- The tap or drill bit breaks in the hole, how to fix it?
- Why do airplanes use rivets instead of welding?
- Why are engineering drawings all blueprints?
- How is a ping pong ball made? It turns out that it is made of two pieces of plas
- What to do if quality is abnormal? Doing these 3 things well is the key!
- Weekly News 9.7-9.13
- Huawei's three-fold screen is approaching, and the domestic supply chain is wait
- Innovative application of digital twin technology in integrated die-casting prod
- 5 types of carbide cutting tools, what are the differences? Save this article an
- Global manufacturing PMI in June was 49.5% | Weekly News 7.6-7.12
- Raw material defects | Machining special operations and practical cases 109
- No wonder Toyota stamping is so good: a day in the life of a Toyota stamping sho
- Analysis on the development trend and demand of China's mold industry
- How many types of sealing rings are there in machinery? What are they used for?
- Hangfa, Hangfa, a scar on the hearts of machine processing workers
- How to mill a large arc surface with a small cutter?
- Dynamics of the processing center of the process! What is the fundamental reason
- 500 ° C ultra -strong aluminum alloy! This problem is overcome
- How much do you know about the hometown of machine tools and molds, how much do

 BACK
BACK MT HOME
 Navbar