Calculation of Eccentric Parts of CNC Lathe
2021.06.03
In the transmission mechanism, eccentric parts such as eccentric workpieces or crankshafts are generally used to complete the function of converting between rotary motion and reciprocating motion. Therefore, eccentric parts are widely used in mechanical transmission. The level of processing technology for eccentric parts (especially for large eccentric parts) can reflect the mechanical processing capability of an enterprise.
Eccentric workpieces occupy a very important position in actual production and life. In mechanical transmission, turning rotary motion into linear motion or turning linear motion into rotary motion is generally completed by eccentric workpieces or crankshafts. For example, the lubricating oil pump in the headstock is driven by the eccentric shaft, and the rotary motion of the crankshaft of automobiles and tractors is driven by the reciprocating linear motion of the piston.
Terminology learning
1) Eccentric workpiece
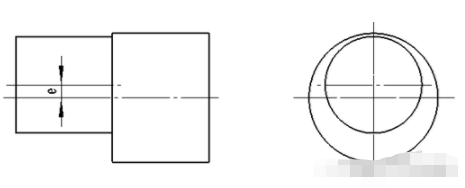
A workpiece whose axis of the outer circle and the outer circle or the axis of the outer circle and the inner hole are parallel and not coincident becomes an eccentric workpiece.
2) Eccentric shaft
A workpiece whose outer circle and outer circle axis are parallel and not coincident is called an eccentric shaft.
3) Eccentric sleeve
The workpiece whose outer circle and inner hole axis are parallel and not coincident is called an eccentric sleeve.
4) Eccentricity
In an eccentric workpiece, the distance between the axis of the eccentric part and the axis of the reference part is called the eccentricity.

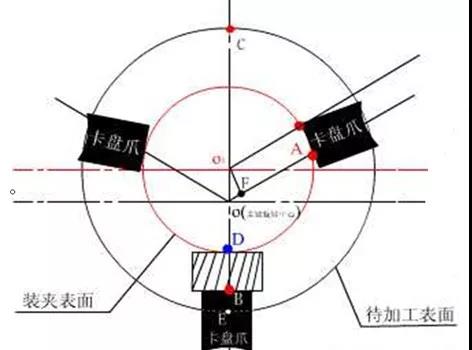
The three-jaw self-centering chuck is suitable for eccentric workpieces with low turning precision, small eccentricity and short length. When turning, the eccentricity of the workpiece is ensured by the thickness of the gasket on a jaw.
Although the traditional machining methods of eccentric workpiece parts and the improved three-jaw turning method can complete the task of machining eccentric workpiece parts, the defects of difficulty in machining, low efficiency, interchangeability and difficulty in guaranteeing precision are incompatible with modern high-efficiency and high-precision machining concepts.
The principle, method and attention of three-jaw chuck eccentricity
The principle of three-jaw chuck eccentricity: adjust the rotation center of the workpiece surface to be processed to be concentric with the axis of the machine tool spindle. Adjust the geometric centroid of the clamping part to the distance from the spindle axis equal to the eccentricity.
Gasket thickness calculation (initial and final) l Gasket thickness calculation formula: x=1.5e+k where:
e——workpiece eccentricity, mm;
k——correction value (obtained after test run, it is k≈1.5△e), mm;
△e——The error between the actual measured eccentricity and the required eccentricity after the test run (ie △e=e-e measurement), mm;
e measurement-actual measured eccentricity, mm;

example 1
Turning a workpiece with an eccentricity of 3mm, if you use the test shim thickness to turn, the actual measured eccentricity is 3.12mm, find the correct value of the shim thickness. l Solution: Try to choose the thickness of the gasket:
X=1.5e=1.5×3mm=4.5mm
△e=(3-3.12)mm=-0.12mm
K=1.5△e=1.5×(-0.12)mm=-0.18mm
According to the formula: x=1.5e+k=(4.5-0.18)mm=4.32mm
The correct value of the gasket thickness is 4.32mm.
Example 2 Turning an eccentric workpiece with a gasket thickness of 10mm on a jaw pad of a three-jaw self-centering chuck. After turning, the measured workpiece eccentricity is 0.65mm smaller than the drawing requirement. Find the correct value of the gasket thickness.
Known eccentricity error△e=0.65mm
Approximate gasket thickness: X test=1.5e=10mm
K=1.5△e=1.5×0.65mm=0.975mm
According to the formula: x=1.5e+k=(10+0.975)mm=10.975mm
The correct value of the gasket thickness is 10.975mm.
Three-jaw turning eccentricity-disadvantages
The three-jaw turning method is used for turning eccentric workpieces, which is suitable for turning single small batches, small eccentric distances, and low precision workpieces. This processing method requires mathematical calculations and requires operators to have higher professional theoretical knowledge. The three-jaw turning method is used to turn and process eccentric workpieces. One pad is placed on one of the jaws of the three-jaw chuck. The calculation method of the thickness X of the pad is as follows: X = 1.5e+ k, where: X is Pad thickness, e is the eccentricity of the workpiece, k is the correction value of the eccentricity of the workpiece (the positive and negative are determined according to the actual measurement result); k = 1.5△e, where △e is the measured error of the eccentricity after the trial cutting; e = e-e measurement, where e measurement is the actual measured eccentricity after trial cutting.
Although the thickness dimension of the cushion block is determined, it is worth noting that the axial length dimension of the cushion block directly affects the parallelism of the axis of the eccentric workpiece. Practice has proved that when the axial dimension of the spacer is less than 15mm, the parallelism of the axis of the eccentric workpiece cannot be guaranteed; when it is greater than 30mm, it is easy to ensure the parallelism of the eccentric workpiece, which is beneficial to ensure the machining accuracy of the eccentric workpiece.
The three-jaw turning method is very correct in theory for machining eccentric workpieces, but it has poor operability in practical applications and has the following defects.
1) Although the thickness dimension and axial length dimension of the cushion block are clarified, the difference in material and processing requirements also seriously affects the processing accuracy of the workpiece, and most of them cannot meet the processing requirements of eccentric workpieces;
2) When aligning the axis parallelism of eccentric workpieces, it is necessary to align the highest side bus or the lowest side bus to be parallel to the spindle axis, which is time-consuming and labor-intensive and may not necessarily achieve good results;
3) Measured eccentricity, half of the reading difference between the highest side bus bar and the lowest side bus bar of the dial indicator is the eccentric distance, that is to say, the position error of the dial indicator touching the highest side bus bar and the lowest side bus bar directly affects the eccentricity distance Measurement accuracy, which directly affects the machining accuracy of the workpiece;
4) The accuracy of the chuck and human installation factors directly affect the machining accuracy of the workpiece when the workpiece is removed and reinstalled, and it is difficult to ensure the accuracy and interchangeability of the workpiece.
Previous:The parameter comparison table of taps and drills is worth collecting!
Next:CNC commonly used calculation formulas are worth collecting!
Related Information
- Industry news
- The tap or drill bit breaks in the hole, how to fix it?
- Why do airplanes use rivets instead of welding?
- Why are engineering drawings all blueprints?
- How is a ping pong ball made? It turns out that it is made of two pieces of plas
- What to do if quality is abnormal? Doing these 3 things well is the key!
- Weekly News 9.7-9.13
- Huawei's three-fold screen is approaching, and the domestic supply chain is wait
- Innovative application of digital twin technology in integrated die-casting prod
- 5 types of carbide cutting tools, what are the differences? Save this article an
- Global manufacturing PMI in June was 49.5% | Weekly News 7.6-7.12
- Raw material defects | Machining special operations and practical cases 109
- No wonder Toyota stamping is so good: a day in the life of a Toyota stamping sho
- Analysis on the development trend and demand of China's mold industry
- How many types of sealing rings are there in machinery? What are they used for?
- Hangfa, Hangfa, a scar on the hearts of machine processing workers
- How to mill a large arc surface with a small cutter?
- Dynamics of the processing center of the process! What is the fundamental reason
- 500 ° C ultra -strong aluminum alloy! This problem is overcome
- How much do you know about the hometown of machine tools and molds, how much do

 BACK
BACK MT HOME
 Navbar