Keyword: CNC machining parts Auto Spare Parts Milling machining Turning parts Grinding machining
Contact person: Nick Lee
Phone: (86) 15362887736
E-mail: sales03@dgmtwj.cn
Tel: (86) 769-88388276
Factory: No.2, Baidai Industrial Park, Daojiao Town, Dongguan, China ,
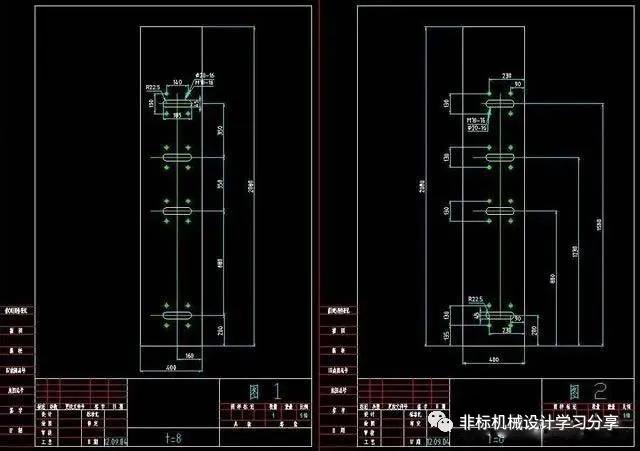
The following is a graph marked by a newly graduated college student and a teacher who has just changed jobs for a long time, as shown in Figure 1 and Figure 2. Do you think which one is better?

To be honest, each of the two icons has its own advantages, and each has its own disadvantages. It can only be said that each has its own merits. The one on the left is more idealized, like a student logo, and the one on the right is more in line with the processing technology, but the two pictures are not perfect.
Let me talk about the picture on the left:
1. Chain labeling is used, and the accumulated error is relatively large, so it is best not to label like this;
2. The horizontal positioning size of the waist-shaped hole is 160. Don't mark it like this. When you actually work, you do it from one side to the other. It is impossible to run back and forth from the middle. That can be troublesome, so this is also not marked. Reasonable;
3. The total length of the waist-shaped hole is 185, do not mark the total length, so the workers have to calculate it for you during processing. What they really need is the center distance of the two semi-circular arcs. It's all mental arithmetic), it's very troublesome to find out after doing it.
4. Only one waist-shaped hole is marked, how do the other three people know if they are the same size? Guess? What if the size is a little different? Also note "4" on the dimensioned waist-shaped holes.
5. There are also problems with the four threaded holes and light holes next to the waist-shaped hole. The number is not indicated, which means that this is only equivalent to the hole next to the waist-shaped hole. Other missing dimensions should be "quantity × M10-16 "The same goes for light holes. It is best not to use "-" for the thread length and use the depth symbol (a horizontal on the upper side and an arrow on the lower side, which cannot be typed here, but there is in the software).
6. The four holes next to the waist-shaped hole should be aligned with the other holes up and down with thin solid lines, so that no one knows the positioning of the other holes.
7. Is there no requirement for dimensional accuracy and geometric tolerance? This is not necessary, but the surface roughness must be, even if the material is not removed, there must be a symbol in the upper right corner! What about the technical requirements?
Let me talk about the picture on the right. This picture also has the same problem as the picture on the left. I won’t repeat it here. Let’s talk about other issues that are not repeated:
1. There is a problem with the size of 130. I didn’t mention it above. Now let’s talk about it. What you mean is that 130 is two holes and the middle plane of the keyway symmetrical, but this label is ambiguous. If it requires two holes and the middle plane of the keyway If the symmetry is better, mark it as 65 and 65. It is estimated that the requirements are not too high, then use the chain standard to guide all the holes in the vertical direction, and align them with thin solid lines in the horizontal direction;
2. Does the waist-shaped hole have depth? There is no description in the two pictures, it may be a through hole, I don't know, or it may not be;
3. Is this T=8 plate thickness? The national standard did not do this, right? Generally, the board thickness is marked in other projections. If there is no other projection, use the annotation to guide it, note t=8, or write it in the technical requirements;
4. Both of them made the same problem, and repeated labeling, 45 and R22.5, should be labelled 45 and R, do not write the radius value afterwards;